
In Chapter 7.2 of our book, we described how to deploy a cluster and run MPI-based parallel program in AWS and Azure. About the time we completed the book, Microsoft and Amazon introduced a suite of new technology that greatly improve the capabilities for mpi-based computation in the public cloud. Google Cloud has provided excellent support for Slurm and IBM has kub-mpi for containerized mpi applications. This article is intended as a “catch-up” for readers of the book. In this first part we describe Azure Batch.
Microsoft Batch
Batch is a service designed to manage the allocation of clusters of virtual machines and scheduling jobs to run on them. Batch can be used directly from the Azure portal or by calls to the batch API. Because a typical application of Batch is to manage a workflow, the API approach is the most natural. For example, if you have an instrument that produces samples for analysis and you need to collect and process them quickly. Instead of doing them sequentially, you can write a script to upload a batch of the samples to the cloud and then, in parallel, fire off an analysis process for each sample on a cluster of workers. This is a version of a parallel map operation in which function is “mapped” over a set of inputs producing a set of outputs. We can also use Batch to group a set of VMs into a cluster and run an MPI job it. The second model is when the individual tasks require message passing communication and synchronization.
The two approaches are illustrated in Figures 1 and 2 below.

Figure 1. Batch application that maps files to tasks to be executed on a pool of VMs.
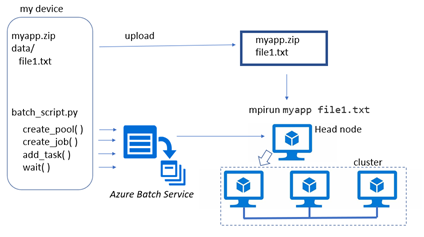
Figure 2. Batch service running MPI program. The pool creation uses one of the node as a head node which rejoins the cluster when the mpi application starts.
The following programs are based on on-line examples from the Azure-Samples. I have updated them to use the latest azure batch and azure storage blob APIs (pip freeze says azure-batch=10.0 and azure-storage-blob=12.6.0). This document will not include all the code. To follow it the examples in detail go to dbgannon/azure_batch (github.com) and look at batch-map and batch-mpi.
Before going into the Batch details, we need to set up an azure storage account. You can do this from the portal. You only need to create a storage account, preferably on the region where you run batch. I used USeast. Once you get that you will need to copy three things from the portal: the storage account name, the storage account key and the connection string. We store these items in the file config.py.
Next you need to go to the Azure portal and create a Batch account. It is very simple. Give it a name and then go to the link where you associate a your storage account with the Batch account. Once the account has been created, go the “keys” tab and copy account url, which is the primary access key. Your confg.py file should look like this.
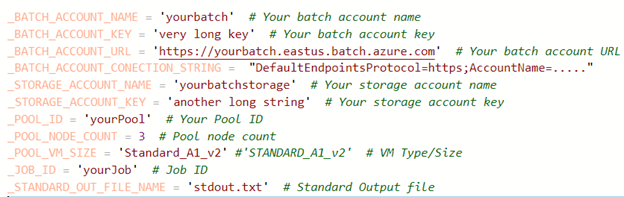
This demo uses Standard_A1_v2 VM instances and a very tiny pool size. You can change this to fit your needs.
The first example is a simple bag of tasks as illustrated in Figure 1. Our application is a simple C program that prints the id of the VM running the app and the IP address of that note. After a 5 second sleep, it reads from the standard input and write what it read to the standard output. I used a separate VM to compile the program into an executable, myapp and zipped that to myapp.zip on my desktop machine.
We next need to move that application to our batch account. Look for the feature “Applications” and click on it. We uploaded myapp.zip with name myapp and set the version to “1”. Later, we will use the string “_1_myapp” to access the application. Now we create the storage containers we will need and upload our data files.

To make it possible for Batch to access the blobs in our input container we need to attach a shared access signature to the blob url for the blob. To write a blob to the output container we need a SAS for that container. We can turn SAS token for a blob into a url that can be used anywhere to access the blob. If we know the Azure blob storage account_name, account_key, the container name and blob name we get the sas token and create the url as follows.

We will use a utility function upload_file_to_container to encapsulate this token and url. This function returns a special object used by batch
batchmodels.ResourceFile(http_url=sas_url, file_path=blob_name)
when it downloads our input files to the worker nodes in the cluster.
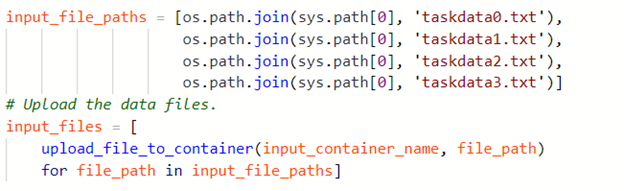
For our demo we will use four input files and they are uploaded as follows.
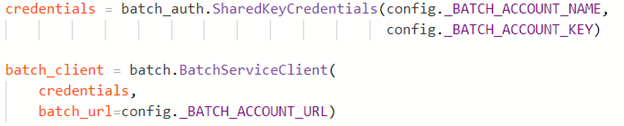
We can now use our Batch account to create a batch_client object.
With that we can now proceed to create the pool, a job and add tasks to launch the computation. The function create_pool (batch_service_client, pool_id) is where we can specify our node details. We do this with
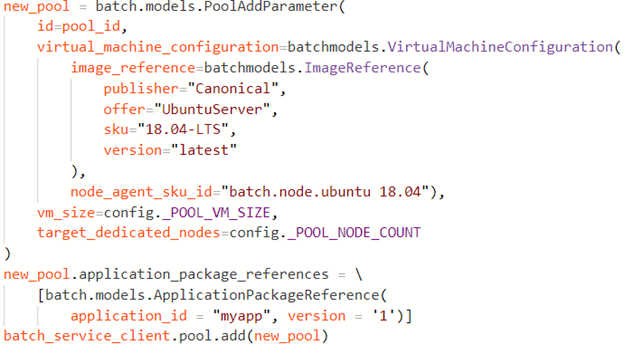
Most of this is obvious specification of the VM, except for the application_package_references. This is a list of the applications we want to download to each node before the computation begins. Recall we created the application myapp version 1 and loaded that into our Batch instance from the portal.
Next, we create a job and then add the tasks to the job. We add one task for each input file. The heart of the add_task function is the following operation.
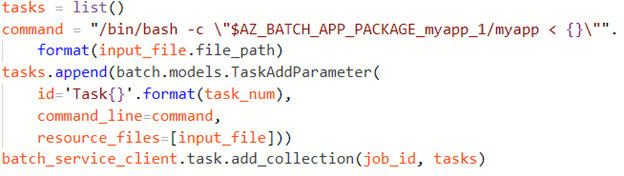
The important point here is that $AZ_BATCH_APP_PACKAGE_myapp_1/myapp resolves to the local path on the node to the myapp binary. Hence the command executed by this task is, as in figure 1,
bash “myapp < filename”
After adding all of the tasks to the job, we invoke the function wait_for_tasks_to_complete(batch_service_client, job_id, timeout) that waits for all tasks to complete or end in an error state.
This is followed by fetching and printing the output of each task by the function print_task_output(batch_service_client, job_id)
Finally, we can use the batch_client to delete the job and pool of VMs.
When this program is run the output looks like
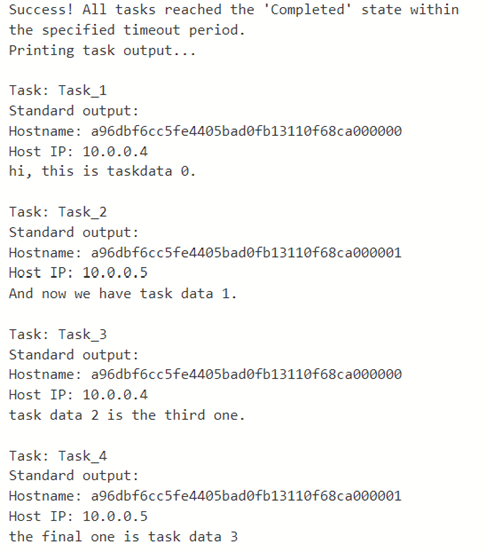
We had two nodes in the pool. As you can see task 1 and 3 ran on one node and 2 and 4 on the other.
Azure Batch MPI
Running an MPI application with Azure Batch is very similar to running the map application describe above. The primary difference is in the construction of the cluster and the construction of the task. In our example we have a simple C mpi program. The program first reads and prints the content of files listed on the command line. Then it uses MPI to pass a number from one node to the next incrementing it by one at each stop.
Finally, for fun, the program does an MPI sum reduce and prints the result.

In the dbgannon/azure_batch (github.com) archive directory batch-mpi the complete code is bing.c.
To compile the program it is best to create a simple VM identical to the one we use as a head node. That is ‘Standard_A1_v2’, ‘OpenLogic’, ‘CentOS-HPC 7.4’. This version of the OS has the Intel MPI compiler and libraries. To activate the right environment run
source /opt/intel/impi/5.1.3.223/bin64/mpivars.sh
Then you can compile the program with mpicc. Move the compiled binary to a zip file and upload it into the Batch application area. In our case we named it aout version 1. As in the previous example we will access it with $AZ_BATCH_APP_PACKAGE_aout_1/bing where, in this case, bing was the name of the binary in the zip file.
The program linux_mpi_task_demo.py is the script to launch and run the mpi program. The basic structure of this script is similar to the map example. We first create input and output containers in our azure storage account. We next upload two data files numbers.txt and numbers2.txt and a file called coordination-cmd which is a bash script that is executed on head node when it is up and running. In our case it just prints the name of the working directory and lists the contests of the root. This is not important for what follows.
Another bash scipt application-cmd is also uploaded. This script does the real work and contains the following lines

Which set our network to tcp (more advanced networks are available if you use a more advanced choice for your node skew.) The mpirun command uses 3 nodes (we will run a cluster of 3 physical nodes. We encapsulate this bash script in the python program as follows.

This application command line is invoked when the cluster has been deployed with one of the node serving as head node.
The Batch team has provided a set of multi_task_helpers functions. One is a function to create the pool and wait for the VMs.

Except that we have modified it to add the ApplicationPackageReference as we did in the map case.

The function waits for all the members of the cluster to enter the idle state before returning.
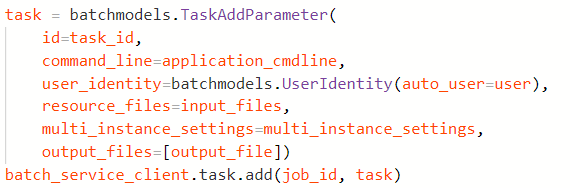
The next step is to invoke multi_task_helpers.add_task. This function installs both the coordination command line and the application command line in the task with the expression
And once the task has been added it is scheduled for execution. The main program now executes multi_task_helpers.wait_for_tasks_to_complete. This function waits for all the subtasks to enter the state “completed’. The rest of the main script helps to delete the resources that were allocated for this execution.
The github repository has a copy of the program output.
Conclusion
What this short tutorial has done is to use Azure Batch to run two types of parallel programs.
- A parallel map workflow in which a single program is mapped over a set of inputs to produce a set of corresponding outputs. We created a cluster of resources and when those were ready we created and deployed a task that invoke our application program on one of the input files. A simple wait-until-complete function can serve as a barrier. In our example we stop there, but one can use the pool of resources to launch additional tasks if so desired.
- If our parallel application needs the induvial tasks to exchange messages or do bulk synchronous parallel processing, the standard message passing interface MPI can be used. This is somewhat more complex, but it follows the same pattern. We create a pool of resources, but in this case, we only generate one task: a head node which runs a standard “mpirun” on a parallel MPI program.
In the next set of tutorials we will run parallel programs on AWS using newer tools than those described in the book.
