
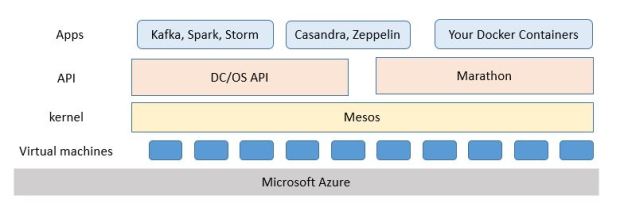
The Microsoft Azure container services are now live and, for the most part, they work very well. There are actually two container services the Azure team is supporting. One is Mesosphere DC/OS and the other is Docker swarm. I have been using various versions of Mesos and Mesosphere for a year now, but those deployments were somewhat ad hoc. Some previous postings are here and here and this article provides some updates to both. These services are now in “general availability”, which is Microsoft speak for “it is now a product”. There is a good start-up tutorial available here which will lead you through the setup phase. In this post we will focus on some basic features of DC/OS and show a very simple example of how well it scales. In a future post we will look at Swarm.
DC/OS
Following the introduction tutorial lined above it was relatively easy to create a DC/OS cluster with 8 worker nodes (and one public node) and one master. Using the instructions, we also created a secure tunnel to the master node mapping port 80 there to localhost port 80. The web link http://localhost on my windows10 box brought up the DC/OS web user interface. What you see is the summary of all of the resources used as shown in Figure 1 below.
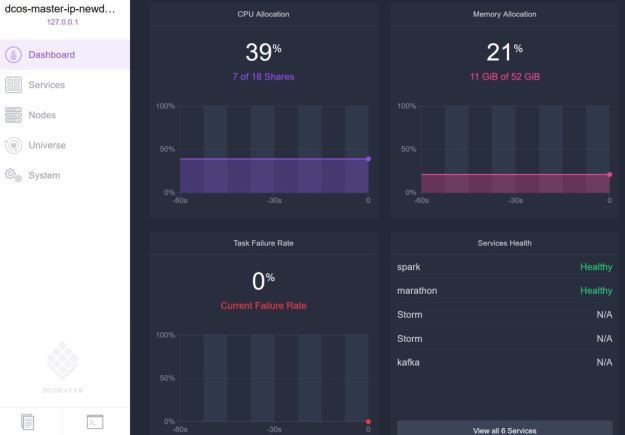 Figure 1. DCOS web interface.
DCOS is the distributed cluster operating system and its job is to support deployed services. The most valuable of these services is Marathon which is a container orchestration service that will allow you to easily scale the number instances of your containers and keep them running. It can also be used to enforce special constraints. For example, if you deploy a docker container that needs to bind to a special port on they host, it will not schedule another conflicting instance on that same host. And it has a very nice graphical user interface shown in figure 2 that can be accessed through the DCOS interface.

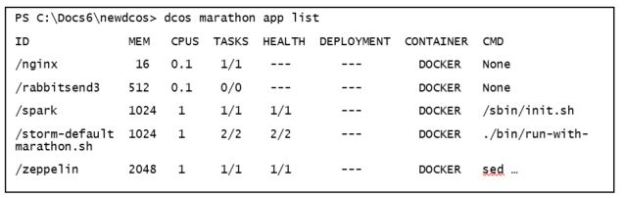
Figure 2. Marathon interface showing all running services.
As you can see above I have an instance of Apache Spark, two instances of the streaming service Storm and one instance of the Zeppelin notebook and one instance of the simple web server Nginx all running. Launching a new Docker container or service is very simple: fill in a web-form. However, there is a command line tool that works very well on linux and windows. For example, to get the information in Figure 2 above the command line call is as follows.
The same command line interface can be used to launch new container instances and we will illustrate that below.
DCOS also has views of the of the individual resources. Figure 3 displays the current view of all of the individual nodes in the cluster showing how many of the nodes are holding active containers or services.
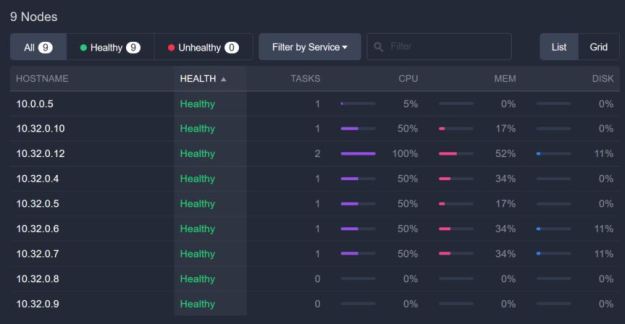
Figure 3. DCOS display of worker node status and load
A Simple Example.
There are many prepackaged apps available for a one-click launch such as those listed above. I originally wanted to Kafka in a demo, but there is still a bug with my deployment that does not allow me to access the Kafka gateway or the public node (10.0.0.5 in the Figure 3 list). I will revise this report with an update as soon as I can solve that problem.
The example is a simple message filtering experiment. Assume you have some source of independent tasks that must be analyzed as fast as possible and the results stored in a table or database. Assume further that you task stream can be pre-filtered into and sorted into buckets of similar tasks that can be analyzed by code that is best suited for the tasks in that bucket. For example, some tasks contain images of landscapes and others contain images of animals and you want to provide analyzers that are appropriate for each. Or you are looking at logging data and your pre-filters detect several different types of anomalies and you want to group anomalies of similar type together. We will use queues to hold the contents of each bucket. The pre-filters push the data into the queues and workers pull the tasks of the queue, do the analysis and push the results to into a table. The general picture is shown in Figure 4 below.
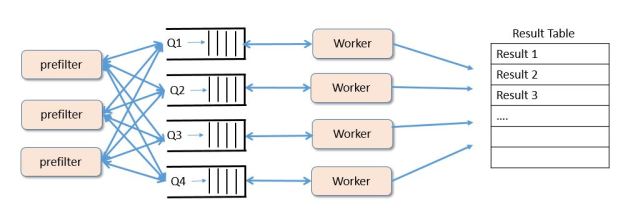
Figure 4. Sample “microservice” configuration for our experiment.
Depending upon the complexity of the analysis undertaken by the worker and the arrival rate of tasks into the queues we may need to increase the number of workers assigned to each bucket queue as shown in Figure 5.
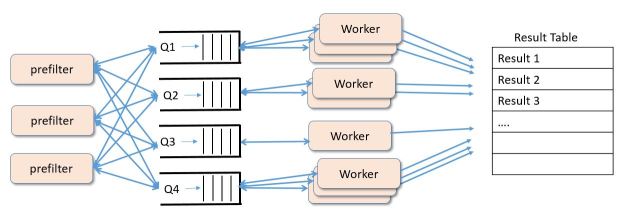
Figure 5. Adding additional workers to manage extra work at each queue.
In this simple experiment we will look at how increasing the number of workers can improve the throughput of the system. Now for the details of the set-up. Instead of using Kafka, we will use another common message broker RabbitMQ that is running on another linux box on Azure. We use the Azure Table service to store the results. Our worker service is a Docker container that is running a simple Python program that has two parts.
- When the worker starts-up it does not know what queue to list to. So it looks in a separate queue called “roles” that will contain the name of the queue needed an extra worker.
- When it has the name of the queue to work on and begin pulling data items from the given queue and processing them and saving them to the table. A time stamp is added to each item as it goes into the table.
In a real application step 2 can include task specialization once the worker knows what queue it is working on. For example, in our text classifier example we loaded specific machine learning tables and states when we knew what topics we were analyzing.
In this example, we are only interested in the basic scale-up performance improvement as we increase the number of workers assigned to each queue. The Python code for the container is not pretty, but you are welcome to read and use it. It is on GitHub here. To deploy the Docker container on DCOS one needs a deployment configuration json file. This config.json is shown below.
{
   "container": {
      "type": "DOCKER",
      "docker": {
          "image": "escigrp/rabbitpullpush"
       }
    },
   "id": "worker",
   "instances": 1,
   "cpus": 0.2,
   "mem": 512,
}
Notice that this specifies that the container is in the Docker hub with the name escigrp/rabbitpullpush and that we wish to devote 0.2 cpus and 512 MB of memory to this resource. And we want one instance.
The dcos command to launch this container in the cluster is
dcos marathon app add config.json
Our “worker” will immediately show up as a deployment on the DCOS Marathon web page.
We are going to measure the throughput of the system in the number of events per second it can process as we increase the number of workers per node. The way the experiment is done is as follows
For N = 1 to 14:
- Preload each of the 4 queues (named “1”, “2”, “3”, “4”) with 500 messages and start up 4*N instances of the worker container with Marathon on DCOS.
- Load the “roles” queue with N instances of each queue name. Each of the four queues will now have N devoted workers.
- When all of the queues are empty, look in the table. Subtract the earliest time stamp from the latest to get an approximation of the elapsed time.
- Use marathon to shutdown the workers and go to step 1.
Recall that there are 8 dual core nodes in the cluster. Each instance of the worker container is allocated 0.2 of a core. This means marathon could possibly schedule 80 instances. However, there are other processes running on cluster so a practical limit was 60. In fact we tested up to 56 container instances (14*4). The results are shown in Figure 6 below.
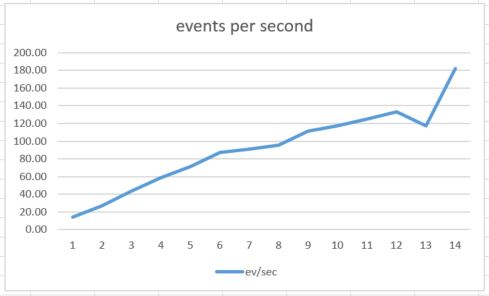
Figure 6. Events processed per second as the number of workers per queue grows from 1 to 14.
There are several surprises for me here. First the performance scales very linearly as the number of container instances grows. Because there are only 16 cores available I expected this to level off when N was near 8 (32 instances), but, with the exception of an anomaly around 13, it kept climbing to N = 14 (56 instances). Second, the absolute performance is not very good. Digging deeper into the code and conducting several additional experiments revealed that the bottleneck is the table insertion due to an old and slow version of the python library. Without the table insertion a single worker container instance call pull events at a rate of about 20 events per second, so 56 instances will be over 1000 events/sec which is well within the range of RabbitMQ.
Dynamic Scaling and Conclusion
A more interesting experiment would be to have the system described above dynamically scale the number of container instances as circumstances require. For example, if one could monitor the depth of each queue, then if a queue starts to grow larger one could issue a command to increase the number of instances devoted to that queue. If the queue is empty one could reduce the number of instances. I am fairly certain there are a number of ways to do this, but one easy way is to use the “marathon update” command. This command allows a “real-time” update to json configuration. Any field in the configuration can be modified. For example, to update the configuration to 10 instances one can issue the command below.
dcos marathon app update worker env='{"instances":"10"}'
This change in status should trigger marathon to make the necessary adjustments and change the number of instances to 10. It would be relatively straight forward to write a program that would poll the event broker for status and check the current queue lengths and, depending on the conditions issue the dcos command above.
Final Thoughts.
It is great to see this container service based on Mesosphere’s DC/OS finally available in a reliable and highly usable form. This an excellent platform for managing large collections of Docker containers and orchestrating microservices deployments. The performance of the system was excellent and the web user interface is well done. The command line interface is solid and only gave me one problem. Installing the command line interface for Kafka caused problems on windows and it did not follow the script here. It seemed to be loading an old version that did not support windows. The other problem was that the DC/OS cluster I deployed on Azure had one public node, but the “public” IP address give for this node was not reachable. (Any reader who knows how to address these problems please comment here and I will update this post. As is often the case, there are easy solutions to problems that stump me.)
In a future post we will look at the Docker Swarm deployment that is also part of this new Azure release.
